
How to Paint Brass Armor
Hello hobby friends!
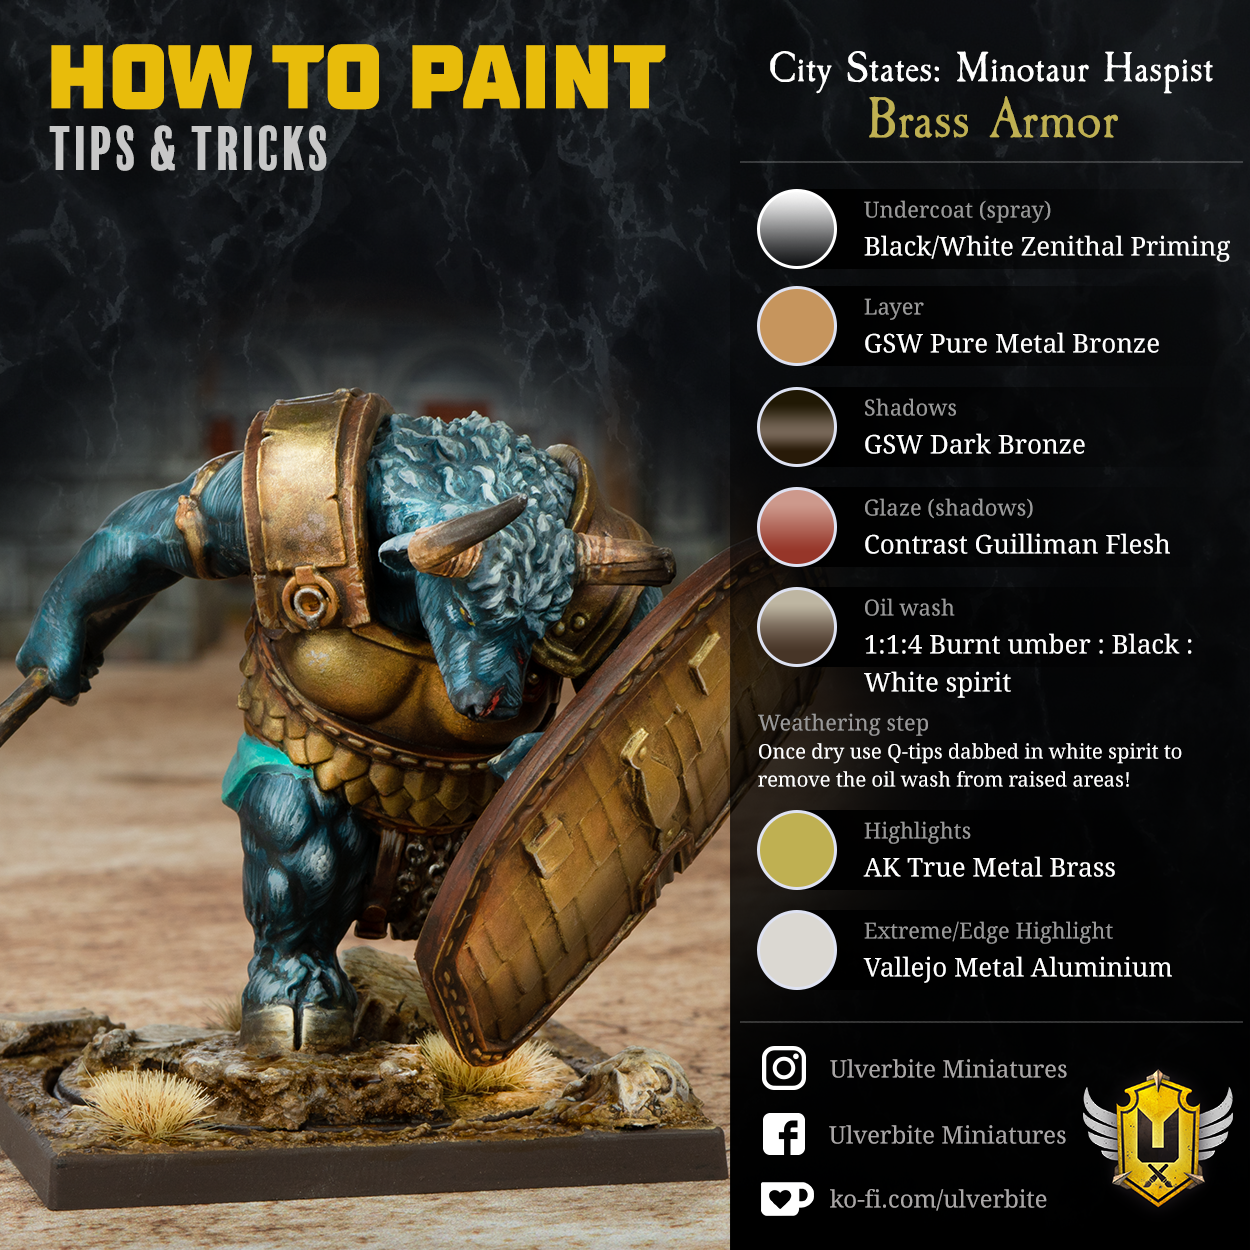
Welcome to another step-by-step painting tutorial from Ulverbite Miniatures. In this guide, I’ll show you how I painted the warm brass armour on my City States Minotaur Haspist from Conquest: The Last Argument of Kings.
This method combines metallic pigments, acrylic metallics, Contrast paint, and an oil wash to create aged brass with deep shadows and bright, reflective highlights. The oil wash does much of the heavy lifting, adding depth and definition while keeping the metallic finish rich.
Paints Needed:
Primer: Black and White for zenithal priming
Base: Green Stuff World Pure Metal Pigments Bronze
Shadows: Green Stuff World Dark Elder Bronze
Deep Shadows: Citadel Contrast Guilliman Flesh
Oil Wash: Burnt Umber + Black + White Spirit
Highlights: AK Interactive True Metal Brass
Final Highlights: Vallejo Metal Color Aluminum
Step-by-Step Process:
Zenithal Prime: Start by priming the miniature black, followed by a white zenithal highlight from above. This creates a useful guide for where the light naturally catches the armour and where the deepest shadows should remain.
Basecoat: Cover the armour with Green Stuff World Pure Metal Pigments Bronze. Aim for a smooth, even metallic finish that will form the foundation for the warmer brass tones.
Build the Shadows: Apply Green Stuff World Dark Elder Bronze into the recessed and less exposed areas of the armour. Focus on creating definition between armour plates and around details while keeping the brighter bronze visible on raised surfaces.
Deepen the Shadows: Glaze Citadel Contrast Guilliman Flesh over the darkest areas. This introduces a warmer reddish-brown tone and adds extra depth to the brass without completely covering the metallic finish underneath.
Apply the Oil Wash: Mix an oil wash using approximately 1 part Burnt Umber, 1 part Black, and 4 parts White Spirit. Apply it across the armour and allow it to settle naturally into the recesses and around details.
Clean the Raised Areas: Once the oil wash has had some time to settle, use a cotton bud lightly dampened with White Spirit to gently remove it from the raised surfaces. This leaves the darker wash in the recesses while restoring the metallic shine on the exposed areas.
Build the Highlights: Use AK Interactive True Metal Brass to highlight the areas most exposed to light. Concentrate on raised surfaces, edges, and details where you want the armour to regain its brighter brass appearance.
Final Highlights: Finish with small, controlled highlights using Vallejo Metal Color Aluminum. Keep these limited to the sharpest edges and the most reflective points to give the armour that final metallic sparkle.
Conclusion:
And that’s it - your brass armour is done!
The combination of warm metallics and an oil wash creates plenty of depth without making the process overly complicated. Cleaning the wash back from the raised areas is especially useful here, as it naturally creates contrast while preserving the shine that makes metallic armour work.
If you try this technique, share your results with me on my Instagram page. I’d love to see how it works on your miniatures!
Grab this Conquest model from the Para Bellum eShop and use code ULVERBITE10 for 10% off. Using the code also helps support my work at no extra cost to you.
If you found this tutorial helpful, you might consider buying me a coffee via Ko-fi. Your support helps me create more content like this. Thank you!